Category Archives: Recipes

Socca

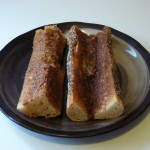
We were introduced to socca, a vegan and gluten-free flatbread, by Mike Dash of Rolling Fire when we took a class on wood-fired cooking through the Experimental College. Mike has been tuning his recipe for years, adjusting the ratios of ingredients, trying special pans, adjusting resting times, and the like. His socca is delicious: creamy and eggy on the inside, crispy and crunchy on the edges, and perfectly balanced in its seasoning.

It’s also only available once a week when he’s at the farmers’ market, and not at all during his off season.

Happily, The Minimalist is right:

I’ve eaten and made both socca and farinata in Nice and in Genoa, and I’ve made it at home a hundred times. It is foolproof and 90 percent as good made in your oven as when whisked from the wood-burning ovens of Nice to the street stands in the market. It’s so simple and its flavors are so pure that unless you buy rancid chickpea flour you will get it right the first try.

Socca made at home from this recipe is merely very good, not transcendent like Mike’s. But that’s good enough for me.

Ingredients:

  • 1 cup (120g) garbanzo/chickpea flour (I use Bob’s Red Mill, but would like to try grinding my own)
  • 1 cup (227g) water
  • 2 tablespoons olive oil
  • 1 teaspoon freshly ground pepper (about 100 turns on the grinder we have)
  • about 1/2 teaspoon of kosher salt, maybe a little more

Whisk all the ingredients together in something you can pour them out of easily; I use a 2-cup pyrex measuring cup. You don’t want any lumps. Set the mixture aside, not in the refrigerator. Ideally, do this several hours before you’re going to actually cook it; I believe that letting it sit for a while to hydrate will lead to a creamier consistency in the final result. But I haven’t actually tested this, since by the time I’m putting together the batter, I want socca as soon as possible.

Anyway, once you have the batter mixture put together, set your oven racks to the middle and high positions if you have two; just the high if you only have one. Put a 12 inch cast iron pan on the rack and set the oven for 450 degrees. I’m using a Lodge 10-1/2-inch round griddle, which makes for a thicker socca than the 12-inch pan the Minimalist recipe calls for. I like it a bit thick, so that works for me. Once your oven has reached 450 degrees, set a timer for 10 minutes and leave the pan in there to get good and hot.

After the pan is hot, take it out and swirl some oil in it (maybe a tablespoon? I never measure), making sure the entire pan is coated. Set the pan back down on the stove and pour the batter in from the center. It should sizzle and push the oil out to the edges. Carefully put the pan back in the oven, and set the timer for 12 minutes.

After 12 minutes, brush the top of the socca with some oil if it looks dry, then turn on the broiler and move the pan to the upper rack. Broil the socca for 3 minutes to get a bit of a charred crust around the edges. Take the pan out of the oven and remove the socca with a thin spatula. Cut it into quarters and eat while it’s still hot. Om nom.

Fauxbley tahini sauce

I could probably go through a bottle a week of Mr. Mobley’s tahini sauce. This is not quite that sauce — I’ve been fiddling with the proportions, but I doubt I’ll ever capture the magic that is Mobley Sauce. Still, it’ll do.

You’ll need to get out your scale for this one. A batch this size comes together well in a two-cup pyrex measuring cup. As far as the oils go, I’ve used canola, sunflower, and peanut oil, and they’ve all been fine. (The peanut oil is especially nice when I use the sauce on whole-wheat noodles.) You could probably sub in some olive oil for some of that, and it’d still be very tasty.

Tahini Sauce

A generous half-cup of neutral oil
100g well-stirred tahini (I’ve been using the Once Again brand)
40g low-sodium tamari (I like San-J)
2 tsp fresh lemon juice
1/2 tsp maple syrup (“Are you serious?” Yes. Yes, I am.)
1/2 tsp cayenne pepper
2 small fresh garlic cloves or 1 big one, crushed
50g water

Stir the tahini into the oil. Then tare the scale, add the tamari, and whisk it together with a fork. Add the seasonings, tare your scale one more time, and add the water. Whisk.

You can use this immediately, but it improves over a few hours. Good on pasta, rice, potatoes, vegetables, and I expect it’d be great with tofu.

Potato / kale / sausage soup

This recipe comes from the Skagit River Ranch stand at the farmers market. Cam made a bunch of this for freezing earlier, so I’m going to add notes for the changes I know about, and maybe she’ll edit this later if I missed anything.

Julie’s Tuscany Soup

Julie, a customer from University market gave us this and it’s delicious and easy! Jan 2010

1 lb Skagit River Ranch Hot Italian Sausage [I’d probably try 3/4 lb next time. — C.]
4 cups chicken broth [We’re probably using Better Than Bouillon no-chicken or vegetable broth.]
6 medium size potatoes, diced [Probably the Desiree variety from Olsen Farms. (I used a good four cups’ worth of diced Desirees. — C.)]
1/2 bunch of kale (4-5 leaves), chopped [Hah. We used two bunches of dinosaur kale, I think. We like kale soup.]
1 tbsp flour or corn starch for thickener if desired [Nah. — C.]
1 tbsp garlic (optional) [Not optional. When is “optional” garlic in a recipe ever actually optional?]
1 cup whole milk [1% milk was fine]
salt and pepper to taste

Take sausage out of casings, break them into small chunks & brown them with garlic. Set aside. In a medium sauce pan, pour 4 cups of chicken broth, bring to boil and add diced potatoes and cook for about 10 minutes until they are almost fork tender. Add kale and meat, cook 10 minutes on low heat. Add 1 cup milk at the end, cook for 3 more minutes and serve. Add flour or starch if you like a thicker soup.

Split pea soup

I just put a couple gallons of split pea soup into the freezer (and had a bowl for dinner). This recipe is adapted from Cook’s Illustrated, mainly in that it uses some smoked ham hocks that we had in the freezer instead of ham steak and bacon.

If you’ve forgotten to thaw the ham hock, take one (around half a pound or so) and put it in a dutch oven or soup pot with 7 cups of water, bring that to a boil, then reduce the heat and cover, simmering for maybe 15 minutes to thaw the hock. Meanwhile, in a separate frying pan, sweat one diced medium to large onion (I used a red onion) with a couple tablespoons of butter and a large pinch of salt. Add two or three minced/pressed cloves of garlic and mix for 30 seconds or so — not long enough to burn the garlic. Then add the contents of the frying pan to your soup pot with the ham hock.

If you were smart and thawed the ham hock in advance, you can save yourself dirtying a frying pan by doing the onions and garlic in your soup pot, then adding the water and ham hock.

To the soup pot (which now contains a ham hock, onions, garlic, and water) add: 1 pound of split peas (recipes always say to rinse and pick through peas, but I’ve never once found a rock or anything else, so I dunno), two large sprigs of fresh thyme, and some bay leaves. Our bay leaves were old and stale, so I used a bunch. Two is what the recipe calls for. Also add a good amount of ground black pepper and crushed red pepper flakes. I guess you could do this at the end, but I don’t think it hurts any to add the spices now.

Bring the soup to a boil, stirring to keep the peas from sticking to the bottom of the pot, then reduce to a simmer and cover. Simmer until the peas are soft, around 45 minutes. Some recipes call for you to soak the peas overnight. Don’t bother.

After 45 minutes, remove the ham hock and add a cup or so each of diced carrots, celery and potato. Tent some foil over the ham hock and let it cool. Keep simmering the soup for another 30 minutes, stirring occasionally.

Optionally, see if there’s any actual edible flesh on the ham hock. There might be some, or it might all be knuckle and connective tissue. If there’s any meat that looks decent, you can strip it out, chop it up, and add it to the soup. Or don’t.

Remove the thyme sprigs and bay leaves, add salt to taste, and serve with a splash of balsamic vinegar.

The original recipe is from the January/February 2011 issue of Cook’s Illustrated, and calls for ham steak, bacon, and no potatoes. That recipe looked entirely too meaty (and a waste of a good ham steak), and I think the smoked ham hock serves the same purpose as the bacon. The potatoes might make it a bit too starchy for some tastes, but I’m calling this a success. I also think the red pepper flakes are a good addition.

Greg Nog’s tofu, more or less

A few years ago there was a thread on Ask Metafilter about tofu in which Greg Nog posted a recipe for baked tofu. Every time I want to make baked tofu I dig up that thread.

Greg Nog’s Tofu, More Or Less
(half recipe)

1 lb package of extra-firm tofu, frozen and thawed
1-2 cloves garlic, put through a garlic press
1 1/2 tablespoons of peanut butter
2 1/2 tablespoons of vegetable oil
2 1/2 tablespoons of soy sauce
cayenne or whatever you like for heat
pinch of dry ginger
black pepper

First, get your oven going to 350. Now squeeze as much liquid out of the thawed block of tofu as you can, then cut it into strips and squeeze each strip carefully. You want to get it as dry as you can so it’ll soak up lots of the marinade that you’re about to make. If you cut the block into seven or eight slabs and cut each slab in half lengthwise, it’ll fit well in a 9×13″ pan.

Mix up your marinade. Add the oils first, then emulsify with the soy sauce. This amount will just cover your tofu, so you might want to be pretty liberal in your measurements. I’m fond of Mama Lil’s hot peppers in oil and am always wondering what to do with the extra flavored oil; about half a tablespoon of it in the vegetable oil mix is good. A little sesame oil is good too. For the bulk of the oil, I prefer peanut oil. When you’ve mixed it all up, taste it for balance.

Cover your tofu with the marinade and bake at 350 for an hour, turning the tofu over half-way through.

Pork Potstickers

This recipe is a combination of Mama Yang’s dumplings and the USENET Cookbook’s Potstickers. I made it today to use up a pound of ground pork from Skagit River Ranch that’s been sitting in the chest freezer for about a year.

Finely chop half of a large napa cabbage and mix it in a large bowl with a fair amount of salt. Let’s say a tablespoon. Mix the salt in well, and let it sit for an hour or two. When you come back, the cabbage will have shrunk. Drain off as much water as you can, and then scoop the cabbage out into a clean dish towel. Mound the cabbage up in the center, then pull the edges of the towel up around it and twist until you have a ball of cabbage twisted up in the towel. Now crank down on that sucker, squeezing as much water as you can out. Really go for it — I got over a cup of liquid out.

Empty the cabbage back into your mixing bowl and give it a stir to break it back up a bit; it’ll be compressed.

Add to the bowl: one bunch of scallions, finely chopped; twenty or thirty grinds of pepper; four finely minced or pressed large cloves of garlic; one teaspoon of sugar; one tablespoon of dark sesame oil; a large mound of grated ginger, maybe the size of a ping-pong ball; one pound of ground pork; four ounces of chopped shrimp meat.

Now give your hands a good wash, then dive in and mix that all up with your hands and fingers. Really give it a good kneading and squeezing, letting the mixture squoosh out between your fingers. You want to mash it up really well, and get all the ingredients nice and distributed. When it’s all mixed in, wash your hands again, because eww.

For the wrappers, I always cheat and use store-bought gyoza wrappers. You’ll need two packages. If you want to make your own wrappers, there are instructions at the original recipes, linked above.

Now get a baking sheet and clear out enough space in your freezer that you’ll be able to fit the sheet in the freezer and close the door. Cut a sheet of parchment paper the size of the bottom of the baking sheet, and lay it down in there.

To fill the wrappers, use a spoon in your dominant hand and scoop out around a tablespoon of filling into the middle of a wrapper laid across the fingers of your non-dominant hand. Getting the right amount of filling can be tricky, but you’ll get the hang of it — you’ll be doing this 60 or 70 times, and practice makes perfect. If you’re using store-bought wrappers, dip your finger into a cup of water and moisten the inner edges of the wrapper (so that they’ll stick when you fold it) and either fold the wrapper in half, forming a semicircle, or gather it up as demonstrated in this video:

As you finish each dumpling, put it on your baking sheet, not touching any other dumpling, but packed as tightly as possible otherwise. When the baking sheet is full, put it in the freezer, put the bowl of filling into the fridge, and take a half hour break. After half an hour, transfer the now-frozen potstickers to a gallon sized ziplock bag and store them in the freezer. Fill the rest of your wrappers and freeze them, too. How many the recipe makes depends on how much filling you put in each one. I made around six dozen today, but some of those were using square wrappers because I couldn’t find any more round ones at the store.

To cook, get a large nonstick pan and add enough oil just to coat the bottom. Heat until the oil shimmers, and carefully place frozen potstickers in the pan, not crowding the pan too much. Ideally, don’t let the potstickers touch each other, because as they cook, they’ll adhere to each other if they’re touching. Let the pan come back up to heat again until you can tell the bottoms are getting a little crisp, and carefully pour in some water, maybe half a cup to a cup, depending on how large your pan is. If you want your finished potstickers to come out darker and a little saltier, add a tablespoon or two of soy sauce. Now cover the pan with a lid, reduce the heat to medium, and cook for five minutes.

Once the five minutes are up, remove the lid and let the water boil off, leaving the oil to finish crisping and browning the bottoms of the potstickers. Give them another minute or two in the pan, then check the bottoms using a thin spatula. If they’ve got a nice brown crust, transfer them to a plate and serve with a dipping sauce made of soy sauce, rice vinegar, and hot chili oil or sesame oil. If you had any ginger left over when you made the filling, you can add it to the dipping sauce before you start making the dumplings and let it infuse.

These will store in the freezer for a while, where they’ll probably get stuck together. If you end up with clumps that you can’t break apart without tearing them, they’re good in soup.

Pantry pumpkin soup

Yesterday I made pumpkin soup.

1 red onion, chopped
4 cloves garlic, chopped
some sort of oil (I used a lightly-flavored olive oil)
1 medium-sized cooking pumpkin, peeled and seeded and chunked
1-2 tsp “better than bouillon” (vegetable) dissolved in a little water
1 tsp tamarind concentrate
~2 tsp hot pepper flakes or to taste

Saute the onion in oil until almost translucent, then add the garlic and saute a little longer. Add the pumpkin, bouillon, and enough water to cover (or use that much good vegetable broth), and simmer until the pumpkin is soft. Puree everything and return it to the pot. Take 1/4 cup or so and mix it in a measuring up with the tamarind paste, then add that back to the pot in batches, stirring it in and tasting as you go. Add hot pepper and simmer until the flavors blend.

This’d be nice with some coconut milk. I might try a little star anise in it, maybe some basil if I had any.

Baked oatmeal

I have a gig this week that has me waking up in the cold, dark winter morning hours. I’m too groggy and rushed to make a good hot breakfast from scratch, but I really want something warm on these mornings. And hot instant cereal? I guess that’s not terrible, but… bleh.

I bake a big batch of steel-cut oats early in the week and then keep on scooping ’em out and reheating them. The basic idea comes from Giver’s Log, courtesy of somebody on Metafilter.

It’s almost not a recipe: take a rounded cup of steel-cut oats and put it in a big oven-safe pot with three cups of water, one cup of milk, and a pinch of salt. Bake at 300, uncovered, for 1.5 hours, then cover it for the last half hour or so. You’ll wing it a little bit with covering and uncovering, baking it for more or less time, depending on how saucy you like your oatmeal.

This makes 3 or 4 days’ worth of oatmeal at once, and it can chill in the fridge for about a week. To reheat, I plop a chunk of it into a small saucepan with a little boiling water (leftover from coffee-making) and break it up with a fork. It’ll take a few minutes to warm up and become creamy.

I like it with ground flax seed, chopped dried peaches, and brown sugar. If I’m feeling fancy — by which I mean “awake” — I might grate a little nutmeg in there.

Vegetarian Grinder

This is from Grand Central Bakery‘s lunch menu:

  • Grand Central Seeded Baguette or Essential Baking Parisian Baguette
  • Sliced avocado
  • Red or sweet onion, sliced extremely thinly
  • Mama Lil’s hot pickled goathorn peppers (mildly spicy will do if you can’t find hot)
  • Balsamic vinegar
  • Provolone
  • Romaine lettuce

This sandwich really requires a good flavorful bread. Grand Central’s seeded baguette and Essential Baking Company’s Parisian baguette are both good.

Cut the bread like Subway used to do, with a V-shaped chunk taken out of the top. This helps keep the avocado in while you’re eating it. If you’re careful, you can cut from the base of the V out towards the sides, turning the top of the bread into a kind of hinged filling-keeping system. (Be vigilant anyway; those avocados are slippery.) Sprinkle one half of the bread with balsamic vinegar. You let it pour out, didn’t you? Well, try to get some of the runoff onto the other sandwich you’re making. You want a fair amount, but not sopping.

On the other half of the bread, sprinkle some of the oil from the pickled peppers. Layer the other components onto the bread. I think the avocado stays in place best if it’s directly next to the bread and not in contact with the cheese, but it may just be a lost cause. You’ll need to adjust the amounts of each ingredient to taste—I like more onion than Cam does, for example, and I think Cam could do without the cheese entirely while I think it’s a necessary component.

Whole Foods’ house brand balsamic vinegar is surprisingly good, incidentally.

The original recipe calls for mayonnaise, but it doesn’t need it at all. You can get about three sandwiches out of one baguette, but I recommend just cutting it in half and making two.

Kale gratin

With a busy January bearing down on us, my domestic impulses have been running high as I try to get as much cooking done beforehand as I can. I’ve been fieldstripping beets and shredding cabbage for borscht, putting up jars of frozen peanut-tomato soup base, making roux for gumbo, portioning out pulled pork for Josh’s lunch, freezing a batch of vegan black bean burger patties, and generally being a kitchen terror.

Tonight’s dinner was the sort of cook-and-freeze-half thing I’ve always meant to be organized enough to actually pull off. It’s a kale gratin based on Kurt Beecher Dammeier’s recipe in Pure Flavor. You could mess around with this quite a bit. I think a little quinoa or barley wouldn’t go amiss, and/or a touch of parmesan cheese.

The “Better Than Bouillon” is a tip from Jerry the Got Soup guy. He’s right; it’s pretty good, and a lot better than the packaged vegetable broths I’ve tried. Not that I’m surprised — Jerry the Got Soup guy wouldn’t steer me wrong.

Kale gratin

a scant two cups of leftover cooked long-grain brown rice
30 leaves of lacinato kale
a sploosh of olive oil
1 smallish onion, finely chopped
1/2 cup water with 1/2 tsp “Better Than Bouillon” veggie base
1 cup milk
1 tsp kosher salt
1/4 tsp black pepper
a little nutmeg
2 large eggs
5 1/2 ounces of semihard cheese such as Cheddar, shredded
1/4 cup of homemade bread crumbs

Preheat the oven to 350 and get out a couple of 6-cup pyrex baking dishes.

Bring a large pot of salted water to a boil. While it’s heating up, wash the kale, strip the stems out, and cut the leaves into strips no more than an inch wide. Blanch the kale for a couple of minutes, drain it, and rinse it to cool. Gently squeeze out the excess water.

In a large bowl, mix the kale, rice, salt, pepper, and nutmeg. It’s convenient to mix this with your hands.

In a large, wide saucepan, heat the olive oil on medium-high. Add the onion and cook until it starts to brown. Add your broth and boil for a couple of minutes until it’s reduced by half. Take the heat down to medium-low and stir in the milk along with the kale mixture. Then remove it from the heat entirely and stir in the eggs and all but 1/4 cup of the cheese.

Divide the mixture between the two baking dishes and top with the rest of the cheese and the bread crumbs. Bake uncovered for forty minutes. Let rest on the counter for about five minutes.

You can freeze one of the gratins for up to three months. Reheat, covered, in a 350-degree oven for 30 – 40 minutes.